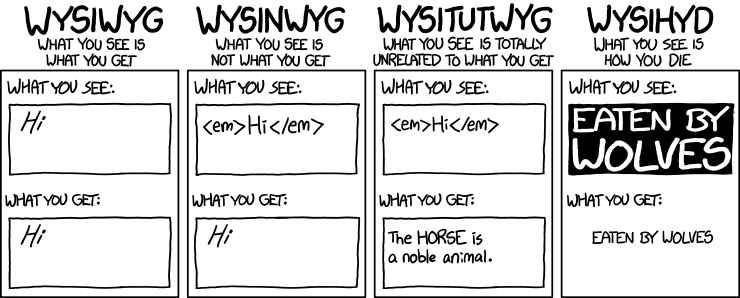
MaTiSSe.py means Markdown To Impressive Scientific Slides
It is basically a very simple and stupid KISS presentation maker based on simple markdown syntax.
For example the markdown code of this slide is:
            _MaTiSSe.py_ means **Ma**rkdown **T**o **I**mpressive
**S**cientific **S**lid**e**s

It is basically a very simple and stupid *KISS*
presentation maker based on simple *markdown* syntax.
All other elements, headers, footers, sidebars, etc…, are handled by MaTiSSe.py once you have setup the theme of your presentation.
The elliptic theme of this slide is made just
            overtheme:
  - slide:
    - border-radius: '50%'
    - data-offset: '200'
    - content:
      - border-radius: '50%'
      - padding: '15% 20%'
      - font-size: '180%'
This is not so complicated, rigth?
There are tons of markdown to html presentation tools. Why yet another presenter?
Because other tools are designed for hackers for producing short, essentially not structured presentation. For high quality scientific presentations we need more, thus MaTiSSe.py born!
MaTiSSe.py should:
- use simple markdown source to produce high-quality html-based presentation;
- support for structured, long presentations:
- presentation metadata;
- sections and subsections;
- helpers, e.g TOC, countdown timer, navigation-controls, etc…;
- support for non structured, short and impressive presentations;
- support for LaTeX equations, both off and online;
- support for scientific contents:
- figure environment fully customizable;
- note environment fully customizable;
- code environment fully customizable;
- support for multimedia contents:
- support for easy theming:
- the user should be able to easily create complex theme without any or with a very poor knowledge of html/css;
- provide an output quality comparable to LaTeX-beamer standard, but:
- be faster than LaTeX compilation;
- be easier than LaTeX programming;
- support cool effects as the modern prezi-like tools have.
If you like these features give a try to MaTiSSe.py, continue to read!
Let me be clear: MaTiSSe.py is designed for scientific researchers, at least the brave ones, being used to write presentation with LaTeX-beamer or other not WYSIWYG presentation makers. LaTeX is great, but some drawbacks can be highlighted:
- the compilation of an even small presentation can be time consuming;
- LaTeX programming can be very inflexible frustrating the user;
- the pdf output has great quality, but it behaves not so well with multimedia content;
- it is rather complicated to introduce prezi-like effects.
- themes handling is very cumbersome, i.e. inner/outer themes = a nightmare;
MaTiSSe.py is designed for scientific researchers that want retain the best of LaTeX-beamer and prezi worlds together overcoming the above listed drawbacks.
Python dependencies
MaTiSSe.py relies on other great python module for making its magic:
External dependencies
MaTiSSe.py relies on other programs that are shipped within MaTiSSe.py itself. The author would like to thank the authors of these programs singularly:
- for
prezi-like effects MaTiSSe.py relies on: - for LaTeX equation rendering MaTiSSe.py relies on:
- for syntax highlighting MaTiSSe.py relies on:
- for resetting the main CSS theme MaTiSSe.py relies on:
Manual Installation
MaTiSSe.py is a complex program built-up by many python modules. However, a one-file-script wrapper is provided.
The tree structure of the MaTiSSe.py project is the following:
            |-- CONTRIBUTING.md
|-- examples
|-- LICENSE.gpl3.md
|-- logo
|-- matisse
|-- MaTiSSe.py
|-- README.md
|-- setup.py
MaTiSSe.py is the wrapper of matisse/matisse.py. To manual install just download the whole project tree and use the wrapper script.
It can be convenient to clone the project:
git clone https://github.com/szaghi/MaTiSSe
and then make a link to the script where your environment can find it.
PyPi Installation
MaTiSSe.py is indexed on PyPi. You can easily install it by pip package manager:
[sudo] pip install matisse
After installation, you are ready to convert your markdown source into impressive html presentation…
You write your presentation in markdown and MaTiSSe.py creates an impressive presentation even if you are a boring scientific researcher. MaTiSSe.py is a not-WYSISWYG command line, CLI, tool. Printing the main help message:
MaTiSSe.py -h
will echo:
            usage: MaTiSSe.py [-h] [-v] [-i INPUT] [-o OUTPUT] [-t THEME] [-hs STYLE.CSS]
                  [-s SAMPLE] [--toc-at-chap-beginning TOC-DEPTH]
                  [--toc-at-sec-beginning TOC-DEPTH]
                  [--toc-at-subsec-beginning TOC-DEPTH] [--print-preamble]
                  [--print-css] [--print-options] [--print-highlight-styles]
                  [--print-themes] [--verbose] [--online-MathJax]

MaTiSSe.py, Markdown To Impressive Scientific Slides
...
The basic usage is:
MaTiSse.py -i your_presentation.md
This command will generate a new directory into which the html presentation is created. To visualize the presentation open the index.html file just created with your preferred browser:
chromium index.html
To generate the presentation you are reading I have used the following command line arguments:
MaTiSSe.py -i getting_started.md --toc-at-sec-beginning 3
That means:
- process the source file
getting_started.md; - insert a TOC at the beginning of each section with a depth of 3,
--toc-at-sec-beginning 3;
MaTiSSe.py will create a directory, named getting_started, into which the compiled html presentation is placed.
Now you must learn how to write your markdown source… Writing a presentation with MaTiSSe.py means:
- write the contents in (extended) markdown syntax;
- define the theme of the presentation.
In both the steps MaTiSSe.py is strongly friendly.
Firstly we see the MaTiSSe.py flavored markdown syntax.
MaTiSSe.py supports the structuring of long presentation. As a matter of fact, for long scientific presentation, it is often useful to structure the talk into chapters, sections and/or subsections. Therefore, after the preamble, where typically the user defines theme and metadata, the presentation structuring starts:
            # First chapter
## First section
### First subsection of first section
#### First slide of first subsection of first section of first chapter
As you can see defining a chapter/section/subsection/slide is very simple: just use the h1/h2/h3/h4 headings of markdown, respectively. The titles of these structures are available as metadata (e.g. chaptertitle, sectiontitle, sectionnumber, slidetitle, etc…) and can be used inside other elements.
Note that if you define at least one chapter all other sections/subsections/slides before this section are omitted:
            ### Bad placed subsection
#### Bad placed slide

# First chapter
#### First slide of first chapter
The same is valid if at least one section or subsection is defined. If --verbose is used this kind of issues are highlighted into the standard output warnings, but the compilation is still completed.
At this point, it is useful to define the MaTiSSe.py universe…
The universe of MaTiSSe.py is composed by an infinite canvas over which the presentation slides are rendered:
- presentation with its own options, having:
- one canvas with its own options over wich the slides are rendered:
- N slide(s) with their own options; each slide has:
$N_H$ headers, with$N_H \in [0,\infty]$ ;$N_F$ footers, with$N_F \in [0,\infty]$ ;$N_L$ left sidebars, with$N_L \in [0,\infty]$ ;$N_R$ right sidebars, with$N_R \in [0,\infty]$ ;- 1 main content.
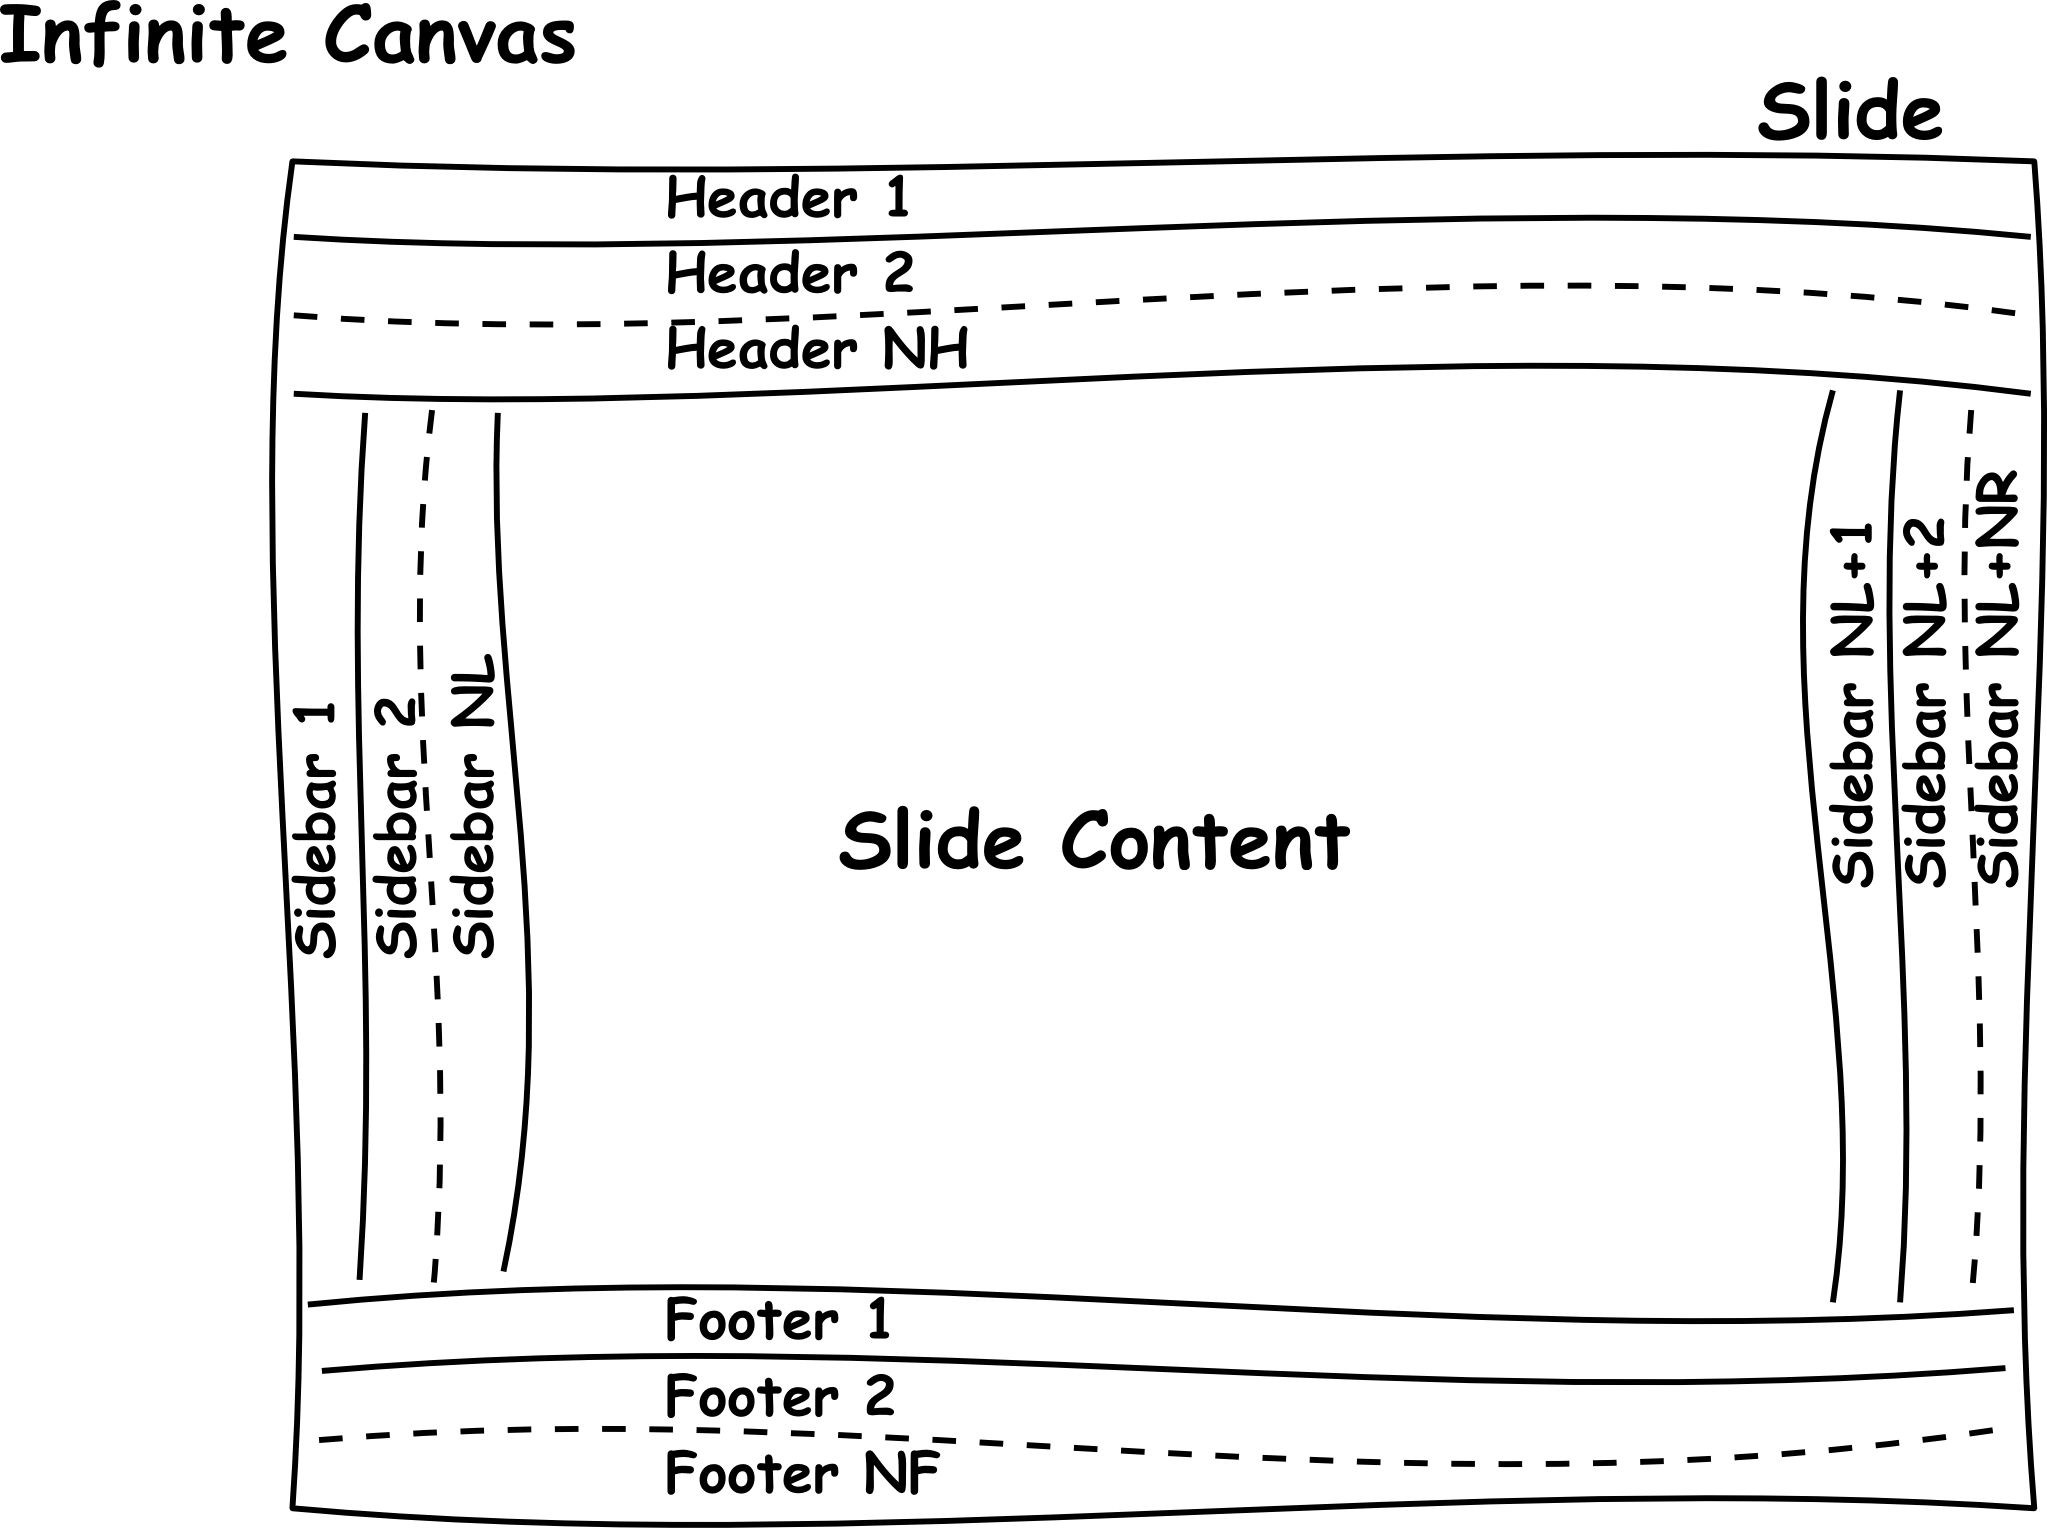
The headers, footers and sidebars are designed to be theme-containers rather than directly accessible containers. This means that the contents of these slide elements is defined by the theme setting, whereas the content element is the one that is directly accessed and where you put your slide contents.
Once you have structured your talk into chapters/sections/subsections it is time to write the slide contents! As aforementioned a slide starts with:
              #### Slide title
...
The Slide title is stored by MaTiSSe.py into its metadata, see the following, and can be handled as a local-to-the-slide variable. What follows the slide title is actually the slide contents: these data is place into the slide content element.
Note that the markdown used by MaTiSSe.py is an extended version of the http://daringfireball.net/projects/markdown/, that is very similar to the one used by GitHub, the so called GitHub Flavored Markdown.
Indeed, the syntax supported by MaTiSSe.py is even more extended with respect the GitHub flavored syntax: MaTiSSe.py supports latex equations and some special environments.
The markdown source is parsed by means of markdown python module: for more informations on the supported syntax see https://pythonhosted.org/Markdown/.
The first extension to the standard markdown syntax is the metadata objects…
For long scientific presentation it is often useful to define some (meta)data in order to reuse them inside the presentation itself. Such data are defined into MaTiSSe.py as metadata. You can define the presentation metadata anywhere into your markdown source, however it has sense to place it at the beginning, inside the presentation preamble, that is just a convention rather than a physical part of the markdown document. The presentation metadata that the user is allowed to define are:
title: title presentation;subtitle: subtitle presentation;authors: list of authors name;authors_short: list of authors name in short format;emails: list of authors emails address;affiliations: list of authors affiliations;affiliations_short: list of authors affiliations in short format;logo: a relative (to final presentation directory) path for the presentation logo image;location: location address;location_short: location short address;date: date of the presentation;conference: conference name;conference_short: conference short name;session: conference session name;session_short: conference session short name;max_time: time the presentation is expected to take;toc_depth: depth of the default rendering of TOCs;dirs_to_copy: paths to copy into the final presentation path, i.e. your assets;css_overtheme: paths of user css files for overriding the main css theme generated by MaTiSSe.py parsing user main theme;
To define the presentation metadata you must use a specific yaml environment, i.e.:
              metadata:
  - metadata-1: 'value-1'
  - metadata-2: 'value-2'
  - metadata-3:
    - value-1
    - value-2
    ...
    - value-n
  ...
  - metadata-n: 'value-n'
there are scalar valued metadata like metadata-1 and list valued metadata like metadata-3
metadata: entry!A complete example of metadata definition into your markdown sources is the following
                  metadata:
  - title: 'your title'
  - subtitle: 'your name'
  - authors:
    - first long author name
    - second long author name
    ...
    - last long author name
  - authors_short:
    - first short author name
    - second short author name
    ...
    - last short author name
  - emails:
    - first author email
    - second author email
    ...
    - last author email
                  metadata:
  - affiliations:
    - first author long affiliations
    - second author long affiliations
    ...
    - last author long affiliations
  - affiliations_short:
    - first author short affiliations
    - second author short affiliations
    ...
    - last author short affiliations
  - logo: 'relative_path_to_your_logo_image'
  - location: 'your location'
  - location_short: 'your short location'
  - date: 'the date'
  - conference: 'conference name'
  - conference_short: 'conference short name'
  - session: 'session name'
  - session_short: 'session short name'
  - max_time: #minutes_the_talk_should_take
  - toc_depth: #depth_of_the_default_rendering_of_TOC
  - dirs_to_copy:
    - path_to_first_directory_to_copy
    ...
    - path_to_last_directory_to_copy
Besides the presentation metadata above described, that are the ones whose value must be set by the user, there are many other metadata whose values are automatically computed by MaTiSSe.py. The following is a not complete list of such metadata:
sectiontitle;sectionnumber;subsectiontitle;subsectionnumber;slidetitle;slidenumber;total_slides_number;toc.
slidetitle, the right sidebar contains the toc, while the footer contains the current slidenumber and total_slides_number among other things.
Such metadata can be directly used also inside the main content slide and not only into the other slide containers. Just use the $metadata[style] notation, where the [style] is the css style for rendering the metadata value and it is optional.For example inserting
$authors[color:#4788B3;]
into the slide content will be replaced by Stefano Zaghi, John Doe
The code listings is accomplished very similarly to the GitHub flavored markdown approach.
Just use fenced code blocks or in-line codes.
highlight.js are supported.For example:
              #!/usr/bin/env python
"""
MaTiSSe.py, Markdown To Impressive Scientific Slides
"""
__appname__ = "MaTiSSe.py"
__description__ = "MaTiSSe.py, Markdown To Impressive Scientific Slides"
__version__ = "v0.0.1"
__author__ = "Stefano Zaghi"
__author_email__ = "stefano.zaghi@gmail.com"
__license__ = "GNU General Public License v3 (GPLv3)"
__url__ = "https://github.com/szaghi/MaTiSSe"
For scientific contents equations environments are mandatory.
The de facto standard of equations typesetting is LaTeX.
MaTiSSe.py supports LaTeX equations!
Just type your equations as you do into your LaTeX source:
              #### Equations, equations, equations... LaTeX is supported!

Just type your equations as you do into your LaTeX sources:

$$
x=\frac{-b\pm\sqrt{b^2-4ac}}{2a}
$$
and you get:
Equations are supported also inside special environments like notes…
As aforementioned, MaTiSSe.py supports some special environments as helpers for some special contents handling. Presently the special environments supported are:
Columnsenvironment;Boxenvironment, that has 4 sub-class environments for more specialized contents:Noteenvironment;Tableenvironment;Figureenvironment;Videoenvironment;
The Columns environment can contain any other data, whereas the Box-like environments can contain any valid markdown source, the metadata, their own specific contents, etc… but they cannot contain the Columns environment.
There is a hierarchy:
Columnsenvironment can contain anything, also other envs;Box-like environments can contain anything, except theColumnsone.
Let us dive into these environments…
It is often useful to subdivide the contents into columns, e.g. to place comments aside figures.
MaTiSSe.py provides an environment for such a contents layout. The syntax is very simple:
              $columns
$column[column1_options]
column1_contents
$column[column2_options]
column2_contents
$endcolumns
As an example see the following:
This two columns environment has been made by means of the following code:
                  Scolumns
Scolumn[width:60%;padding-right:1%;border-right:1px solid #4788B3;]
This two columns...

Scolumn[width:40%;padding-left:1%;]
...
Sendcolumns
100/columns_numer% by default for having an uniform spaced columns environment.The generic box is designed to contains any contents you want to be rendered with a different theme with respect other paragraph. The syntax is the following:
              $box
$style[style_options]
$caption(caption_type)[caption_options]{caption}
$content(content_type)[content_options]{content}
$endbox
where:
$ boxand $endboxare the tags defining the box environment;$style[style_options]defines the style of the whole box; this is optional and can be omitted; thestyle_optionsare any valid css style definitions;$caption(caption_type)[caption_options]{caption}defines the caption of the box that can be styled differently from the main box content and it is optional; the(caption_type)defines caption prefixing class, e.g. Fig. for figures, and it is itself optional: any sentences are valid; to disable the printing of the prefixing class use$caption(none)...; the[caption_options]defines the style options of the only caption: they are any valid css definitions; the{caption}defines the caption text and it must be present if$captionis defined;$content(content_type)[content_options]{content}is not optional: it defines the box’s content; the(content_type)defines defines the type of the content, ‘figure’, ‘table’, ‘note’ and ‘box’ for generic environments, and it is itself optional; the[content_options]defines the style options of the only content: they are any valid css definitions; the{content}defines the content data;
Consider the following code:
              #### Box environment example

$box
$style[background:rgb(100,100,100);]
$caption(Mybox)[font-size:90%;color:white;]{An example of a generic Box}
$content[font-size:120%;color:white;]{This box has a grey background with white colored text. The caption has a 90% with respect the slide content font-size, whereas the box contents itself has a 120% font-size.}
$endbox
This example defines a box having a grey background with white colored text:
Note that the themes of box environments can be defined, as all other theme elements, once for all into the preamble in order to not have to repeat the styling options for each box. The syntax for defining the boxes styles is commented into the theming section in the following.
The note environment is a subclass of box one that is specialized for rendering notes. The syntax is the following:
              $note
$style[style_options]
$caption[caption_options]{caption}
$content[content_options]{content}
$endnote
where the elements are the same of box environment, but:
- the
content_typeandcaption_typeare automatically set tonoteandNoterespectively; anyhow they can be still specified inside the$ note/$endnoteenvironment; - no matter the order of
$caption/$contentstatements, the caption is always placed above the content.
You have seen this env on many preceding slides. Consider the following code:
              $note
$content{
As all other box subclass, the themes of note environments can be defined once for all into the preamble in order to not have to repeat the styling options for each note.
}
$endnote
becomes
The table environment is a subclass of box one that is specialized for rendering tables. The syntax is the following:
              $table
$style[style_options]
$caption[caption_options]{caption}
$content[content_options]{content}
$endtable
where the elements are the same of box environment, but:
- the
content_typeandcaption_typeare automatically set totableandTablerespectively; anyhow they can be still specified inside the$ table/$endtableenvironment; - no matter the order of
$caption/$contentstatements, the caption is always placed above the content.
Consider the following code:
                  $table
$caption{My fancy Table}
$content{

|  /  | foo | bar | baz |
|-----|-----|-----|-----|
| a   | 1   |  2  |  3  |
| b   | 2   |  3  |  4  |
| c   | 3   |  4  |  5  |

}
$endtable
This becomes =>
| / | foo | bar | baz |
|---|---|---|---|
| a | 1 | 2 | 3 |
| b | 2 | 3 | 4 |
| c | 3 | 4 | 5 |
The figure environment is a subclass of box one that is specialized for rendering figures. The syntax is the following:
              $figure
$style[style_options]
$caption[caption_options]{caption}
$content[content_options]{content}
$endfigure
where the elements are the same of box environment, but:
- the
content_typeandcaption_typeare automatically set tofigureandFigurerespectively; anyhow they can be still specified inside the$ figure/$endfigureenvironment; - the
contentmust be the (relative to the root) path of an external figure file; - no matter the order of
$caption/$contentstatements, the caption is always placed below the content.
You have seen this env on some preceding slides. Consider the following code:
              $figure
$content[padding:1% 5%;width:90%;box-shadow: 7px 7px 5px rgba(200,200,200,0.3);border-radius:25px]{images/matisse-universe-no_bg.png}
$caption(none){MaTiSSe.py **Universe**}
$endfigure
becomes => …
Note that, as all other box subclass, the themes of figure environments can be defined once for all into the preamble in order to not have to repeat the styling options for each figure.
The Video environment is a subclass of box one that is specialized for rendering videos. The syntax is the following:
              $video
$style[style_options]
$caption[caption_options]{caption}
$content[content_options]{content}
$endvideo
where the elements are the same of box environment, but:
- the
content_typeandcaption_typeare automatically set tovideoandVideorespectively; anyhow they can be still specified inside the$ video/$endvideoenvironment; - the
contentmust be the (relative to the root) path of an external video file; - no matter the order of
$caption/$contentstatements, the caption is always placed below the content.
Consider the following code:
              $video
$content[width:95%;]{video/big_buck_bunny.mp4}
$caption(none){Big Buck Bunny, https://peach.blender.org/about/}
$endvideo
becomes => …
Note that, as all other box subclass, the themes of video environments can be defined once for all into the preamble in order to not have to repeat the styling options for each video.
Titlepage is indeed a special slide rather than a special environment. It is designed to be a special slide that is not inserted into the TOC. To define a titlepage the syntax is:
#### $titlepage
To obtain a plain slide that is ready to be filled with a very custom contents (typically the titlepage does not contain headers, sidebars and footers) just use a plain overtheme
              #### $titlepage
---
overtheme:
  slide:
---
The titlepage of this presentation has been made with a code similar to the following:
              #### $titlepage
---
overtheme:
  slide:
---
$box
$style[width:100%;height:35%;background:#4788B3;font-family:'Comic Sans MS', cursive, sans-serif;]
$content[color:white;text-align:center;]{
$title[font-size:200%;padding-top:2%;]
$subtitle[font-size:120%;padding-top:2%;]
$logo[height:50px;]
}
$endbox
...
It is common to split long presentation into multiple files. These file can be included into the main source by
$include(relative_path_to_external_file)
As an example the metadata and theme definition can be placed into separate files and included into the presentation as in the following example:
              $include(metadata.dat)

$include(theme.dat)

## First section

### First subsection

#### First slide
include statements are parsed one time at the beginning of the MaTiSSe.py execution, therefore no recursive inclusions are admitted.Now it is time to talk about theme customization…
Do you are interested to learn how complex was to set the theme of this presentation? Continue to read!
I known, you have just seen the universe of MaTiSSe.py, this is just a recall… The customizable theme elements are:
- presentation with its own options, having:
- one canvas with its own options over wich the slides are rendered:
- N slide(s) with their own options; each slide has:
$N_H$ headers, with$N_H \in [0,\infty]$ ;$N_F$ footers, with$N_F \in [0,\infty]$ ;$N_L$ left sidebars, with$N_L \in [0,\infty]$ ;$N_R$ right sidebars, with$N_R \in [0,\infty]$ ;- 1 main content.
In the following subsections we will see how to customize each element.
Presently, the canvas container has only one default option:
background, defaultradial-gradient(rgb(240, 240, 240), rgb(190, 190, 190)).
You can define other css options, however the background seems to be only with a sense for a canvas container.
To set the canvas options use the following syntax:
              theme:
  - canvas:
    - background: 'red'
The canvas you are viewing is made by:
              theme:
  - canvas:
    - background = radial-gradient(rgb(240, 240, 240), rgb(110, 110, 110))
Lists are ubiquitous in presentation. It is very desirable to have the possibility to customize ordered and unordered lists items. This can be done modifying the CSS theme of your talk. However, it is not very simple, as a consequence MaTiSSe provides a very friendly approach for customizing your list.
For example see the following results:
Unordered list with customized color and symbol
- Foo;
- bar;
- baz;
Ordered list with customized color and symbol
- Foo;
- bar;
- baz;
Lists themes definition
                  theme:
  - copy-from-theme: True
  - ordered-list:
    - padding-bottom: '0.8em'
    - background: 'rgba(241,241,241,0.5)'
  - ordered-list-items:
    - content: 'counter(item, upper-roman)'
    - color: 'pink'
  - unordered-list:
    - padding-bottom: '0.5em'
  - unordered-list-items:
    - color: '#4788B3'
    - content: "'\\25D5'"
The content css option of the example uses the css code \\25D5 for rendering the items. As useful resources for finding nice glyphs and the corresponding codes see:
- http://unicode-table.com/en/
- http://www.evotech.net/articles/testjsentities.html
Table of Contents, TOC, is a particular metadata and its handling is very different from any other metatada. Consequently TOC has its own special theme that can be customized by the following syntax:
              theme:
  - toc:
    - css-1: 'value'
    - css-2: 'value'
    ...
    - chapter-emph:
      - css-1: 'value'
      - css-2: 'value'
      ...
    - section-emph:
      - css-1: 'value'
      - css-2: 'value'
      ...
    - subsection-emph:
      - css-1: 'value'
      - css-2: 'value'
      ...
    - slide-emph:
      - css-1: 'value'
      - css-2: 'value'
      ...
As common for MaTiSSe.py the css-n: 'value' pairs are valid css style options. Into the TOC it is possible to emphasize the current chapter/section/subsection/slide as it has been done for this presentation. The syntax to define an emphasized current position into the TOC is:
For example the theme of the TOC of the this presentation is:
              theme:
  - toc:
    - font-variant: 'small-caps'
    - chapter-emph:
      - border: '1px solid #4788B3'
      - border-radius: '5px'
    - section-emph:
      - border: '1px solid #4788B3'
      - border-radius: '5px'
    - subsection-emph:
      - border: '1px solid #4788B3'
      - border-radius: '5px'
    - slide-emph:
      - border: '1px solid #4788B3'
      - border-radius: '3px'
The rendering of this theme can be seen on the right sidebar of this slide or in the following TOC:
Table of Contents
To customize a box-like environments the syntax is the following
              theme:
  - box:
    - css-1: 'value'
    - css-2: 'value'
    ...
    - caption:
      - css-1: 'value'
      - css-2: 'value'
      ...
    - content:
      - css-1: 'value'
      - css-2: 'value'
      ...
Note that the first css definition are used for the main style box options whereas caption and content have their own css definition.
For example the notes of the this presentation use the following theme:
            theme:
  - note:
    - display: 'inline-block'
    - font-variant: 'small-caps'
    - box-shadow: '7px 7px 5px rgba(200,200,200,0.3)'
    - border-radius: '20px'
    - caption:
      - padding: '0 2%'
      - color: '#4788B3'
      - border-bottom: '1px solid #4788B3'
      - display: 'inline-block'
    - content:
      - padding: '0 2%'
      - font-size: '120%'
This presentation uses:
            theme:
  - canvas:
    - background: 'radial-gradient(rgb(240, 240, 240), rgb(110, 110, 110))'
  - toc:
    - font-variant: 'small-caps'
    - chapter-emph:
      - border: '1px solid #4788B3'
      - border-radius: '5px'
    - section-emph:
      - border: '1px solid #4788B3'
      - border-radius: '5px'
    - subsection-emph:
      - border: '1px solid #4788B3'
      - border-radius: '5px'
    - slide-emph:
      - border: '1px solid #4788B3'
      - border-radius: '3px'
  - note:
    - display: 'inline-block'
    - font-variant: 'small-caps'
    - box-shadow: '7px 7px 5px rgba(200,200,200,0.3)'
    - border-radius: '20px'
    - caption:
      - padding: '0 2%'
      - color: '#4788B3'
      - border-bottom: '1px solid #4788B3'
      - display: 'inline-block'
    - content:
      - padding: '0 2%'
      - font-size: '120%'
The slide theme container has the following default css options:
display, defaultblock;width, default900px;height, default700px;
To customize the global options of slide container the syntax is the following
            theme:
  - slide:
    - css-1: 'value'
    - css-2: 'value'
    ...
Such a theme data can placed anywhere inside your markdown source, however it has sense to place it at the beginning inside the presentantion preamble, that is just a convention rather than a physical part of the markdown document.
The slide options of the slide you are reading is made by
            theme:
  - slide:
    - width: 900px
    - height: 700px
    - border-radius: 10px
    - background: green
    - color: rgb(102,102,102)
    - font-size: 100%
    - transition: horizontal
Note that transition is not a standard css option, it a special one of MaTiSSe.py. Let us now discuss about some of the special options.
The transition option set the transition effect between subsequent slides. Presently, the available values for this options are:
horizontal: the slides are placed into a horizontal raw from left-to-right direction; this the default setting;-horizontal: the slides are placed into a horizontal raw from right-to-left direction;vertical: the slides are placed into a vertical column from top-to-bottom direction;-vertical: the slides are placed into a vertical column from bottom-to-top direction;diagonal: the slides are placed into a diagonal line from top/left-to-bottom/right direction;-diagonal: the slides are placed into a diagonal line from bottom/right-to-top/left direction;diagonal-x: the slides are placed into a diagonal line from top/right-to-bottom/left direction;diagonal-y: the slides are placed into a diagonal line from bottom/left-to-top/right direction;absolute: the slides are placed exactly where indicated bydata-x,data-yanddata-zoptions.
The absolute transition mode has a practical use just for a local-slide overriding theme that is the subject of a following subsection: if you set slide-transition = absolute in the preamble settings and you do not set the data-x, data-y and data-z values for each slide all slides will be placed in the same point… the canvas center!
The data-scale option set the scaling factor of the slides. By default it is set to 1. This option has a practical use just for a local-slide overriding theme that is the subject of a following subsection: changing its value in the preamble settings has no visual effect because all slides will be rendered with the same scaling factor. On the contrary, setting different scale for different slides using local-slide overriding theme will produce a nice zooming effect…
To be written…
The header element is designed to render data in a single row above the main content rather than wrap the content into multi-lines.
Note that the width of headers is automatically set to 100% and should not be customized from users.
To customize the options of header n. N the syntax is the following
                theme:
  - slide:
    - header-N:
      - css-1: 'value'
      - css-2: 'value'
      ...
      - metadata:
        - metadata-1:
          - css-1: 'value'
          - css-2: 'value'
          ...
Each header is indicated by its own number: the numeration can be not strictly consecutive, e.g. you can start with header 2 instead of header 1. However, the insertion follows the number order, thus header 1, if present, is inserted before header 2.
The header of the slide you are reading is made by
                theme:
  - slide:
    - header-1:
      - height: '6%'
      - padding: '1% 2%'
      - background: '#4788B3'
      - color: 'white'
      - border-radius: '10px 10px 0 0'
      - metadata:
        - slidetitle:
          - padding: '0% 0%'
          - font-size: '150%'
          - float: 'left'
          - font-variant: 'small-caps'
        - logo:
          - height: '100%'
          - float: 'right'
The footer element is designed to render data in a single row below the main content rather than wrap the content into multi-lines.
Note that the width of footers is automatically set to 100% and should not be customized from users.
To customize the options of footer n. N the syntax is the following
                theme:
  - slide:
    - footer-N:
      - css-1: 'value'
      - css-2: 'value'
      ...
      - metadata:
        - metadata-1:
          - css-1: 'value'
          - css-2: 'value'
          ...
Each footer is indicated by its own number: the numeration can be not strictly consecutive, e.g. you can start with footer 2 instead of footer 1. However, the insertion follows the number order, thus footer 1, if present, is inserted before footer 2.
The footer of the slide you are reading is made by
                theme:
  - slide:
    - footer-1:
      - height: '6%'
      - padding: '1% 2%'
      - background: '#86B2CF'
      - color: 'white'
      - metadata:
        - timer:
          - controls: ''
          - font-size: '70%'
          - font-variant: 'small-caps'
          - float: 'right'
        - total_slides_number:
          - float: 'right'
          - padding: '0 1%'
        - custom-1:
          - value: ' of '
          - float: 'right'
        - slidenumber:
          - float: 'right'
          - padding: '0 1%'
        - custom-2:
          - value: 'slide '
          - float: 'right'
The sidebar element is designed to render data in a single column aside, left or right, the main content.
Note that the height of sidebars is automatically set to 100% and should not be customized from users.
To customize the options of sidebar n. N the syntax is the following
                theme:
  - slide:
    - sidebar-N:
      - css-1: 'value'
      - css-2: 'value'
      ...
      - metadata:
        - metadata-1:
          - css-1: 'value'
          - css-2: 'value'
          ...
Each sidebar is indicated by its own number: the numeration can be not strictly consecutive, e.g. you can start with sidebar 2 instead of sidebar 1. However, the insertion follows the number order and the left to right order, thus left sidebars are inserted before right one and sidebar 1, if present, is inserted before sidebar 2.
The sidebar of the slide you are reading is made by
                theme:
  - slide:
    - sidebar-1:
      - position: 'R'
      - width: '20%'
      - padding: '1% 2%'
      - background: 'linear-gradient(#4788B3,#86B2CF)'
      - color: 'white'
      - border-radius: '0'
      - metadata:
        - title:
          - font-weight: 'bold'
          - font-variant: 'small-caps'
          - font-size: '105%'
          - display: 'inline-block'
        - authors:
          - font-variant: 'small-caps'
          - font-size: '90%'
          - display: 'inline-block'
        - affiliations:
          - margin-top: '4%'
          - margin-bottom: '10%'
          - font-variant: 'small-caps'
          - font-size: '80%'
          - white-space: 'pre-wrap'
          - display: 'inline-block'
        - toc:
          - depth: '3'
          - font-size: '70%'
The content element is designed to render the main slide contents.
Content element has the following default css options:
display, defaultblock;width, default100%;height, default100%;
Note that the height and width are automatically computed by MaTiSSe.py accordingly to the dimensions of headers, footers and sidebars, thus it has no sense for the user to set them.
To customize the options of content the syntax is the following
            theme:
  - slide:
    - content:
      - css-1: 'value'
      - css-2: 'value'
      ...
The content of the slide you are reading is made by
            theme:
  - slide:
    - content:
      - background: 'white'
      - color: 'rgb(102,102,102)'
      - padding: '1%'
This presentation uses:
                theme:
  - slide:
    # global slide
    - width: '900px'
    - height: '700px'
    - border-radius: '10px'
    - background: 'green'
    - color: 'rgb(102,102,102)'
    - font-size: '100%'
    - data-offset: '20'
    # elements
    - content:
      - background: 'white'
      - color: 'rgb(102,102,102)'
      - padding: '1%'
    - header-1:
      - height: '6%'
      - padding: '1% 2%'
      - background: '#4788B3'
      - color: 'white'
      - border-radius: '10px 10px 0 0'
      - metadata:
        - slidetitle:
          - padding: '0% 0%'
          - font-size: '150%'
          - float: 'left'
          - font-variant: 'small-caps'
        - logo:
          - height: '100%'
          - float: 'right'
                    ...
    - footer-1:
      - height: '6%'
      - padding: '1% 2%'
      - background: '#86B2CF'
      - color: 'white'
      - metadata:
        - timer:
          - controls: ''
          - font-size: '70%'
          - font-variant: 'small-caps'
          - float: 'right'
        - total_slides_number:
          - float: 'right'
          - padding: '0 1%'
        - custom-1:
          - value: ' of '
          - float: 'right'
        - slidenumber:
          - float: 'right'
          - padding: '0 1%'
        - custom-2:
          - value: 'slide '
          - float: 'right'
    ...
                ...
    - sidebar-1:
      - position: 'R'
      - width: '20%'
      - padding: '1% 2%'
      - background: 'linear-gradient(#4788B3,#86B2CF)'
      - color: 'white'
      - border-radius: '0'
      - metadata:
        - title:
          - font-weight: 'bold'
          - font-variant: 'small-caps'
          - font-size: '105%'
          - display: 'inline-block'
        - authors:
          - font-variant: 'small-caps'
          - font-size: '90%'
          - display: 'inline-block'
        - affiliations:
          - margin-top: '4%'
          - margin-bottom: '10%'
          - font-variant: 'small-caps'
          - font-size: '80%'
          - white-space: 'pre-wrap'
          - display: 'inline-block'
        - toc:
          - depth: '3'
          - font-size: '70%'
In the previous slides we learn that metadata can be used inside the theme definition. Considering a generic theme element, the syntax is the following:
            theme:
  - slide:
    - element: # header, footer or sidebar
      - metadata:
        - name-1: # metadata name, e.g. title, sectiontitle, etc...
          - css-1: 'value'
          ...
        - name-2: # metadata name, e.g. title, sectiontitle, etc...
          ...
Each metadata can be styled or it can inherit the style from its element container. For example:
              - slide:
    - element: # header, footer or sidebar
      - metadata:
        - title:
        - authors:
          - font-variant: 'small-caps'
defines 2 metadata:
'title'that ha no special style;authorsthat has its own special style, i.e. a customfont-variant.
The toc metadata is a special case. If styled it can accept a non standard css option, the depth:
              - slide:
    - element: # header, footer or sidebar
      - metadata:
        - toc:
          - depth: '3'
          - font-size: '70%'
A very nice MaTiSSe.py feature is the possibility to define a theme locally to each slide, the so called slide overtheme, and change the theme on-the-fly. The syntax is the following:
            #### Slide Title
---
overtheme:
  - slide
    # any valid slide-level theme
---
just put the slide themes into a yaml block environment, named overtheme after the slide title and the slide will be rendered with its own theme.
If you do not believe me, look the following slide!
Where is the header, footer and sidebar?
Why the font family is comic-like?
Why the slide transition has been different from the previous?
Because this slide has the following overtheme:
            ---
overtheme:
  - slide:
    - transition: 'diagonal'
    - content:
      - font-family: Comic Sans MS, cursive, sans-serif
---
                overtheme:
  - slide:
    - background: white
    - header-1:
      - height: 6%
      - background: white
      - color: '#822433'
      - metadata:
        - slidetitle:
          - font-variant: small-caps
          - font-size: '150%'
    - footer-1:
      - height: '3%'
      - width: '90%'
      - float: right
      - background: '#822433'
    ...
                    ...
    - footer-2:
      - height: '6%'
      - padding: '1% 2%'
      - background: '#822433'
      - color: white
      - metadata:
        - title:
          - padding: '0 1%'
        - date:
          - padding: '0 1%'
        - total_slides_number:
          - float: right
          - padding: '0 1%'
        - custom-1:
          - value: ' of '
          - float: right
        - slidenumber:
          - float: right
          - padding: '0 1%'
        - custom-2:
          - value: 'slide '
          - float: right
MaTiSSe.py has been greatly inspired by LaTeX-Beamer class.
MaTiSSe.py author has used LaTeX-Beamer for many years and truly loves it.
LaTeX-Beamer is widely used in the scientific community. Therefore MaTiSSe.py should offer support for LaTeX-Beamer community. In particular the reproduction of LaTeX-Beamer themes should be as easy as possible.
In the following slide we try to reproduce some of the most used LaTeX-Beamer theme.
For each theme the overtheme definition is reported as code listings.
Theme definition
            overtheme:
  - slide:
    - header-1:
      - width: 75%
      - height: 10%
      - background: white
      - color: black
      - float: right
      - border-radius: 0
      - metadata:
        - slidetitle:
          - font-size: 150%
    - sidebar-2:
      - position: L
      - width: 25%
      - background: #272586
      - color: white
      - min-height: 100%
      - metadata:
        - toc:
          - depth: 1
          - font-size: 120%
          - text-align: right
          - line-height: 500%
          - padding: 30% 5%
          - float: right
                overtheme:
  - slide:
    - header-1:
      - height: '10%'
      - background: '#3333B3'
      - metadata:
        - slidetitle:
          - font-size: '150%'
    - footer-1:
      - height: '6%'
      - background: '#3333B3'
      - metadata:
        - authors_short:
          - float: 'left'
          - height: '100%'
          - width: '20%'
          - padding: '1% 2%'
          - background: '#191959'
        - title:
          - float: 'left'
          - font-size: '80%'
          - height: '100%'
          - width: '35%'
          - padding: '1% 2%'
          - background: '#262686'
        ...
Theme definition:
                        ...
        - date:
          - float: 'left'
          - font-size: '80%'
          - height: '100%'
          - width: '35%'
          - padding: '1% 2%'
          - background: '#3333B3'
        - total_slides_number:
          - float: 'right'
          - padding: '0 1%'
        - custom:
          - value: ' / '
          - float: 'right'
        - slidenumber:
          - float: 'right'
          - padding: '0 1%'
Theme definition:
overtheme:
- slide:
- header-1:
- height: '4%'
- background: 'black'
- color: 'white'
- padding: '1% 2%'
- metadata:
- title:
- font-size: '90%'
- header-2:
- height: '4%'
- background: '#191959'
- color: 'white'
- padding: '1% 4%'
- metadata:
- custom-1:
- value: 'Ð'
- float: 'left'
- font-size: '90%'
- sectiontitle:
- font-size: '90%'
...
...
- header-3:
- height: '4%'
- background: '#262686'
- color: 'white'
- padding: '1% 6%'
- metadata:
- custom-1:
- value: 'Ð'
- float: 'left'
- font-size: '90%'
- subsectiontitle:
- font-size: '90%'
- header-4:
- height: '6%'
- background: '#3333B2'
- color: 'white'
- padding: '1% 2%'
- metadata:
- slidetitle:
- font-size: '160%'
Theme definition:
overtheme:
- slide:
- header-1:
- height: '6%'
- background: 'white'
- color: 'black'
- padding: '1% 2%'
- border-top: '8px solid #9999D9'
- border-radius: '0'
- metadata:
- title:
- font-size: '90%'
- header-2:
- height: '6%'
- background: 'white'
- color: '#9999D9'
- padding: '1% 4%'
- metadata:
- custom-1:
- value: 'Ð'
- float: 'left'
- font-size: '90%'
- sectiontitle:
- font-size: '90%'
...
...
- header-3:
- height: '6%'
- background: 'white'
- color: '#9999D9'
- padding: '1% 6%'
- border-bottom: '8px solid #9999D9'
- metadata:
- custom-1:
- value: 'Ð'
- float: 'left'
- font-size: '90%'
- subsectiontitle:
- font-size: '90%'
- header-4:
- height: '8%'
- background: 'white'
- color: '#9999D9'
- padding: '1% 2%'
- metadata:
- slidetitle:
- font-size: '160%'
Theme definition
                overtheme:
  - slide:
    - header-1:
      - height: '10%'
      - background: '#3333B2'
      - color: 'white'
      - padding: '0'
      - metadata:
        - custom-1:
          - value: '.'
          - float: 'left'
          - height: '100%'
          - width: '20%'
          - color: '#262686'
          - background: '#262686'
        - slidetitle:
          - float: 'left'
          - padding: '1% 2%'
          - font-size: '190%'
    ...
                    ...
    - sidebar-1:
      - position: 'L'
      - width: '20%'
      - padding: '1% 2%'
      - background: '#3333B2'
      - color: 'white'
      - border-radius: '0'
      - metadata:
        - title:
          - font-weight: 'bold'
          - font-variant: 'small-caps'
          - font-size: '105%'
          - display: 'inline-block'
        - authors:
          - font-variant: 'small-caps'
          - font-size: '90%'
          - display: 'inline-block'
        - affiliations:
          - margin-top: '4%'
          - margin-bottom: '10%'
          - font-variant: 'small-caps'
          - font-size: '80%'
          - white-space: 'pre-wrap'
          - display: 'inline-block'
        - toc:
          - depth: '3'
          - font-size: '70%'